Another Dragon Con has come and past and I was extremely busy this time around! I'll be posting more in-depth recaps and build logs, but for now I just want to say thanks to everyone I had a good time with and that it was a great weekend for me.
The Colonial Marines & Xenos project was finished and I'm very happy with how our costumes turned out.
Alternate title: What I Learned While Managing A Group Cosplay
A few weeks after Dragon Con 2014, I was talking with Adam Greene of Pixelbash Props about what the "cosplay community" really was, and how people connected - or didn't connect - outside of conventions. Specifically, we got on the subject of how Dragon Con can attract tens of thousands of people - many from the Atlanta area - and yet there doesn't seem to be any large group or gathering of cosplayers out in the real world. I assumed that either A.) there was an existing group / meetup and we weren't aware of it, or B.) it didn't exist. Being optimistic, I believed the second option and we created a monthly social event at Freeside, creatively called the Atlanta Cosplay Meetup.
After meeting for a few months and making a lot of new friends, we started talking about the possibility of doing a group cosplay. A project we could all work on together! I'd never done a large scale group project like that before and it seemed like a great challenge and a lot of fun. After some debate, we settled on what seems like an obvious choice - Colonial Marines from the Aliens franchise.
The plan was to break the costume down into manageable chunks and spread the work out amongst the group. We decided to use Pepakura for the majority of the armor segments, with some sections 3D printed to be molded and cast. There is an open door policy at the public events at Freeside, so we anticipated a lot of people who would come to learn who would have little or no experience using these techniques. It would take us a while to really form a core group of people who were apart of the project, but we quickly moved right into building.
In order to speed up the tedious pep process, we utilized Freeside's laser cutter and went with cardboard rather than card stock. This made it a lot easier to get the basic shapes down and assembled, which was good because at the start of this project, no one had ever used Pepakura before! The first few build sessions consisted of cutting out the cardboard pep pieces, gluing them together with hot glue, then coating them with fiberglass resin for strength. Once everyone got their hands dirty putting together the Pepakura pieces, the process went really quickly.
From here we applied bondo body filler to the surface of the parts to smooth them out and sculpt them into shape. This is by far the most tedious part of the build, and we spent most of our build days working the bondo into the correct shapes. The "bondo minions" made quick work of everything and the armor masters looked really great.
One of the machinists at Freeside helped by lathing up some grenades. We'll eventually mold these and pour cast copies.
Meanwhile, Adam was working on 3D printing the Pulse Rifle and some of the armor bits. The Pulse Rifle was taken from the Aliens: Colonial Marines game and put through a process (which I will detail more soon!) to increase the detail level. It was then sliced into sections to fit into the various 3D printers we have access to, and printed in parts. Once it was fully printed out, it was assembled and several work days spent cleaning up the print lines so it wouldn't look like a 3D printed gun.
We were also working on a couple Xeno costumes as well. Kevin was working on the Xeno head sculpt.
Valentin worked on a mechanism to make the Xeno tongue action work in a really dynamic way. The tongue mechanisms were laser cut out of acrylic with a few 3D printed bits, all driven by a geared DC motor and controlled by an Arduino.
Going back to the Marine armor, once we had our masters finished and ready, we were going to vacuum form several of them and slush cast others in resin. Molds were made of all of the parts, and for the vacuum forming we poured plaster into the molds to create the forming bucks. Here, Adam is working on pulling copies of a few parts of armor.
Other molds had Smooth Cast 65D resin slush cast in them in several coats, to create the armor bits. We had a few duds due to some incorrect resin measuring, but that's the price of learning!
Meanwhile we cleaned up the vacformed parts. We had to cut off the flashing and trim up the edges, and set them all aside to get ready for paint.
The Pulse Rifle was also molded up in probably the biggest 2 piece block mold I've ever seen. This was used to rotocast and back fill with expanding foam to create a light weight, rigid prop. We actually wound up taking the mold to MomoCon and did a live casting demo at the booth!
We were down to the wire building and painting armor. About a dozen of us worked in teams painting on base coats, then doing the camo patterns. Each set of armor consists of about 15 pieces and each had to be painted.
The last 2 days before the con, we got very little sleep! Here, Adam and Elliott passed out in the living room.
Wednesday came and went, and unfortunately we simply ran out of both time and steam. There were some issues with the Xeno head sculpt as well, causing it to crack before we could get it molded. Thankfully this was found before we spent the time (and materials!) molding it.
The good news is that MomoCon was a huge success. We had a lot of fun at our booth and we met a ton of people. We got to show off our work and Freeside, and introduce a lot of people to the idea of a hackerspace!
It was a really long weekend.
As it stands, the project is nearly complete. We need to fabricate a few more sets of armor and do some painting, then put everything together. We'll be together at Dragon Con, so be sure to check back for photos in September!
With less than 70 days left to Dragon Con, I wanted to post up an update on my current works in progress before I don't have any free time!
The main event this year is Vi. I feel like I've been working on her for months and months now, but the reality is that other projects got way in the way and had to put it on hold for a while. Thankfully I'm back in full swing now! The goggles are finished and ready. The legs are fully 3D printed and currently being cleaned up. The backpack and shoulder armor is being 3D printed at this time and will be finished in a few weeks. I've commissioned Katja Von Designs, the woman who made my Princess Peach dress last year, to make the jacket and corset.
My custom built 3D printer is very nearly finished. At this point I have everything I need, and I just need to machine some of the aluminum parts before it's ready to start being used. Finally!
In my spare time, I've been slowly chipping away at a handful of helmets I have from Shawn Thorrson - the Iron Man Mk 3, the War Machine, and the Iron Man Godkiller. I've had these for a while and I really should finish them and have them available to display!
I'm also trying to get a couple new Ultron 5 helmets out the door!
I also recently picked up an Ant-Man helmet from a friend and I'm trying to get that ready to wear to the Ant-Man premiere next month.
Someone asked me recently how I achieved the metal look in some of the things I've built, so I wanted to share that here. I use these three Rust-Oleum paints for the base of any grey / silver metallic paint job that I do:
The Aluminum is used as a base coat, and the Matte Nickel and Charcoal are applied in varying layers to give different looks. For example with the Gravity Gun, I alternated light coats of each color to give a worn metal look.
I've been fairly quiet on here for some time now, and I'm very sorry about that. Things have been very busy for me the past several months and I feel like I am only just now able to start doing prop making seriously again.
Dragon Con was amazing and I loved building the new Ultron helmet. I'm very happy with how the sculpt and electronics came out with that, and it's given me a lot of ideas for some projects for the future.
This past November, I decided to join the board of directors at Freeside Atlanta, the hackerspace that I do my prop work out of. I've been a member since about mid 2013 and I have very much enjoyed the space and the community. There are a lot of awesome people there and I've loved meeting them and sharing knowledge an experience! I wanted to get more involved and do what I can to help the organization grow, and I've been involved in other communities in the past and knew I had experience and talent to bring to the table.
What I didn't expect was exactly how much of my time doing so would take up. Pretty much from the start I've had a lot of my already limited free time taken up with various tasks and projects in the shop itself. Instead of going to the space to work on projects, the space became my project. Not that I'm complaining - I've been enjoying the experience and I think I've helped accomplish some awesome things! - but learning to balance it has been tricky.
At Freeside I've been shepherding the 3D printers there and making sure they stay in working order. It's been a bit of a tall order, but the process has been a good learning experience! I've also started teaching classes on 3D printing and laser cutting, two of my favorite methods for building things. While this does take up a bit more of my free time, the upside is that I've essentially been able to build my 3D printer for free.
Oh yeah, I've also started to build my own personal 3D printer. It's a mish-mash of ideas from printers I like - the Prisa i3, the MendelMax 2, the LulzBot TAZ - all coming together to build a large area printer for prop making purposes. As of this post I have the chassis designed and assembled, and all but the last few bits purchased. I'm hoping to have it in operation by the end of March.
Until then, my prop work continues! I have a few irons in the fire right now, all of which are very exciting.
I am slowly plugging away at my Vi from League of Legends build. I'm using some new 3D modeling and printing techniques on her, we'll see how it goes. So far I'm very happy!
I've taken a very special commission that I don't want to spoil just yet. Let's just say it's definitely going to grab your attention!
Then lastly, I am working with the Atlanta Cosplay Meetup to build Colonial Marines and Xenos! We are meeting several times a month to build costumes and so far our builds have been going incredibly well.
I'm going to try and stay on top of this blog a bit better now that I am more regularly building things. Next post will likely be a build write-up!
My most recent major project was to upgrade a costume I built last year of the Marvel comic's character, Ultron. The costume owner wanted a new and improved helmet, made of cast resin and full of all sorts of lights. It was a big and ambitious project, and I was very excited to get started.
Here's how we got there.
From the outset we decided that we wanted the master sculpt to be 3D printed - but for those of you familiar with 3D printing, you know that extremely large prints are difficult if not impossible to produce. Most often, you will have to break your model up into many different segments, which you then assemble like a 3D jigsaw puzzle. We opted not to do that, and instead outsourced to a professional 3D printing company based in Florida called TheObjectShop. They have a Zcorp 650, which is a very large printer that prints in a plaster like material, which is then hardened with cyanoacrylate AKA super glue.
The resulting print, while expensive, was absolutely phenomenal.
Like all 3D prints, the surface had a texture to it that was unsuitable for our needs. I set about cleaning up the surface to as smooth as I could get it, a process which took about 2 and a half weeks. The process is simple - spray the piece with filler primer, fill any large problem areas with bondo or spot filler, and use increasingly finer grits of sandpaper - but extremely tedious and time consuming. I started at 80 grit to knock down some of the bigger problem areas, and worked my way up to 800 grit wet sanding. The results were a helmet that was nearly flawless.
Now that our master sculpt was completed, we had to create a 2 part jacket mold out of silicone. This would allow us to produce many different copies in urethane resin later down the line. Urethane resin is lighter weight and more sturdy than the brittle plaster 3D print. These are important factors, considering it would be worn for 6-8 hours a day (if not more) and require a bunch of electronics glued and bolted inside of it.
To create the 2 part mold, first we have to make a parting wall all the way around the helmet, which will be the interfacing layer where the 2 sides of the silicone molds touch. We use the end of our Xacto knife to create little bumps all along the edge, which are registration keys that help the two halves line up properly.
Once the first half of the silicone mold is applied, we flip the whole thing over, remove the parting wall, and apply a coat of releasing agent before we apply the second half of silicone. The releasing agent is absolutely critical - silicone will not stick to anything except other silicone. Without the releasing agent, we would essentially create a big silicone bowl which would be next to impossible to use for our purposes.
Once both halves of the silicone mold were created and fully cured, we created an outer rigid mother mold. This is used to keep the silicone mold held together, once the master is removed and the mold is hollow. It is also applied in two halves, and like the silicone we use a releasing agent when creating the second half.
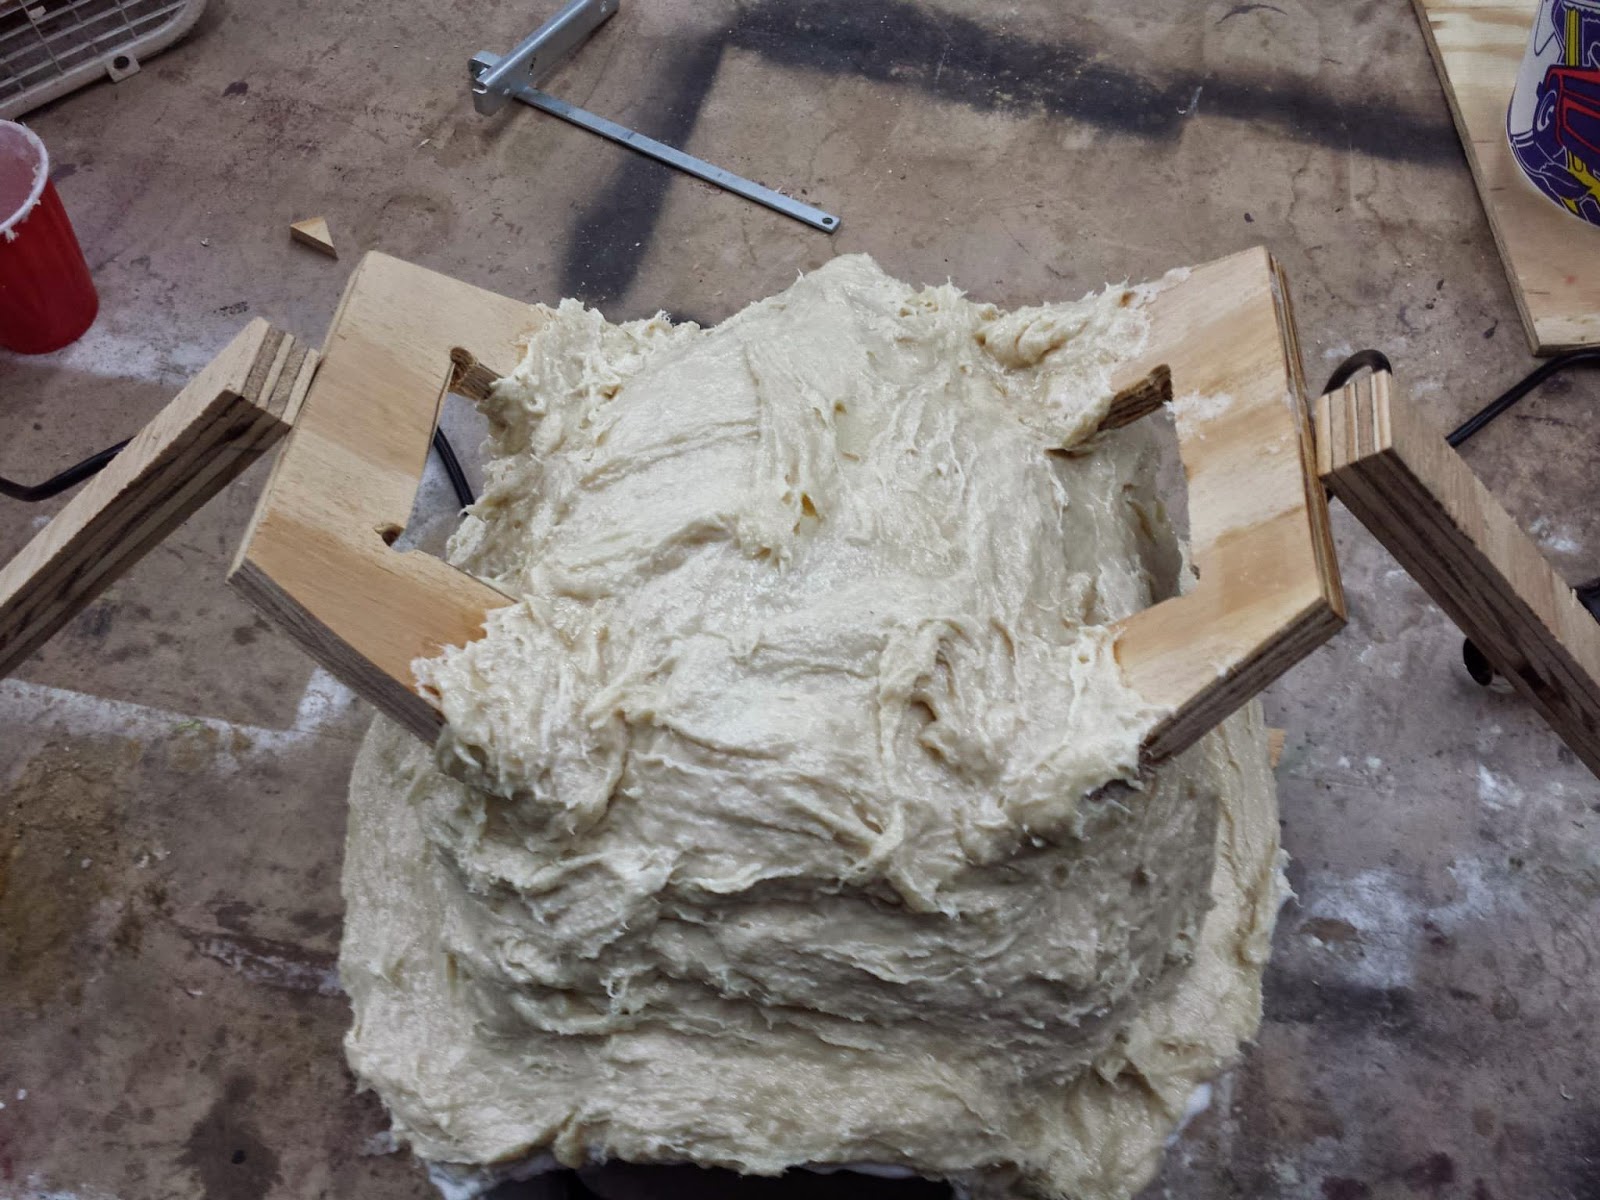
To make the hollow casting, we use a technique called rotocasting or slush casting. This is where you pour a bit of your urethane resin into the hollow mold and rotate it around so that it evenly coats all of the surfaces with a thin layer. This is done 4-5 times using several small batches of urethane resin, so that we ensure every surface has an even thickness. Because the mold weighs around 10 to 15 pounds before we put a drop of resin into it, and because each layer requires about 5 minutes of tossing it around, I decided to build handles to form into the mother mold. This makes the mother much easier to hold onto during the already strenuous rotocasting process.
After you are finished casting, it's time to remove the mother and the silicone mold. What you are left with is a perfect reproduction of your master sculpt in a much lighter material. The casting process itself is a bit of a learning curve as every mold will be different. Certain areas will come out to be thinner than others, and the exact amount of material you need to use for each batch will depend on a lot of factors. What this means is that the first few castings will tend to be "duds", meaning they are unsuitable for your ultimate purposes - in our case, a wearable costume.
However, you can still dress up one of these bad casts and stick it on a mannequin to live in the space!
While we were working on sculpting the master and producing the molds, we were also working on the electronic guts that would go into the helmet. Specifically, there would be a set of LEDs set into laser cut acrylic, and a custom made 8 x 24 LED matrix for the mouth.
The eye LEDs are rather simple - I drew up a 2D design to bridge the width of the helmet's eyes, and then cut that out of 2 layers of opaque white acrylic. The inner layer was made of 6mm acrylic which the LEDs were set into and glued into place, and the outer 3mm layer was flat. The results are menacing glowing red eyes.
The mouth LED matrix, on the other hand, is worthy of it's own individual blog post, which I will be putting up later. The short version is that we found and used an Arduino Micro connected to three MAX7219 chips, which are designed to control an 8 x 8 matrix. The matrix had to be designed and wired up by hand, a process which took about 3 weeks of work. After some trial and error with the MAX7219 board kits we used, the whole thing was put together and worked flawlessly. Here is a test video of the center matrix in our temporary holder.
After the matrix was finished, a cover was laser cut out of 1mm clear acrylic and installed into the mouth. The LEDs were transferred into a similar housing for their permanent installation, and all of the boards were put into craft foam holders for protection and installed into the helmet. The results were nothing short of perfect!
At this point the project was finished and ready to be worn, but like any good project it has sparked a whole host of new ideas and "how to do it better"s.
I am an Atlanta based artist making props, weapons, and armor from my favorite video games and comic books. I am interested in 3D printing, laser cutting, CNC, and all manner of digital fabrication. I am involved in the Atlanta hacker / maker community, doing everything from Arduino art installations to maker education.


