Tuesday, June 30, 2015

June Project Updates

With less than 70 days left to Dragon Con, I wanted to post up an update on my current works in progress before I don't have any free time!

The main event this year is Vi. I feel like I've been working on her for months and months now, but the reality is that other projects got way in the way and had to put it on hold for a while. Thankfully I'm back in full swing now! The goggles are finished and ready. The legs are fully 3D printed and currently being cleaned up. The backpack and shoulder armor is being 3D printed at this time and will be finished in a few weeks. I've commissioned Katja Von Designs, the woman who made my Princess Peach dress last year, to make the jacket and corset.


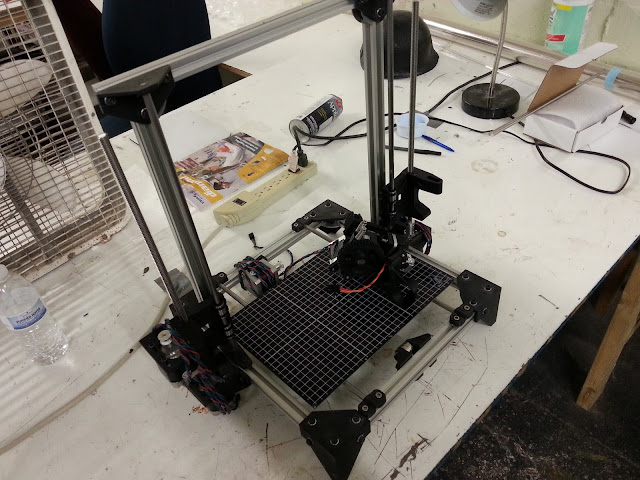
My custom built 3D printer is very nearly finished. At this point I have everything I need, and I just need to machine some of the aluminum parts before it's ready to start being used. Finally!


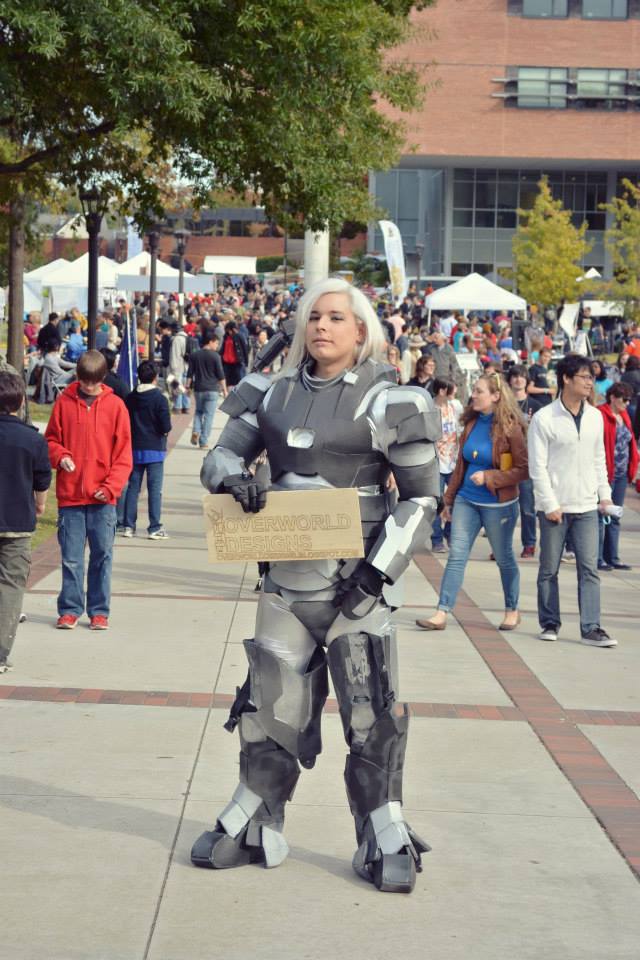
In my spare time, I've been slowly chipping away at a handful of helmets I have from Shawn Thorrson - the Iron Man Mk 3, the War Machine, and the Iron Man Godkiller. I've had these for a while and I really should finish them and have them available to display!


I'm also trying to get a couple new Ultron 5 helmets out the door!


I also recently picked up an Ant-Man helmet from a friend and I'm trying to get that ready to wear to the Ant-Man premiere next month.


Very shortly I'll be starting on Furiosa's bionic arm for my friend Laura. As you can see, she's already really excited to get started!

A photo posted by Laura (@vauuughn) on

Someone asked me recently how I achieved the metal look in some of the things I've built, so I wanted to share that here. I use these three Rust-Oleum paints for the base of any grey / silver metallic paint job that I do:


The Aluminum is used as a base coat, and the Matte Nickel and Charcoal are applied in varying layers to give different looks. For example with the Gravity Gun, I alternated light coats of each color to give a worn metal look.

More soon.
Read More

Wednesday, February 25, 2015

Hiatus, Updates, and Works in Progress

Hello internet! Long time no chat.

I've been fairly quiet on here for some time now, and I'm very sorry about that. Things have been very busy for me the past several months and I feel like I am only just now able to start doing prop making seriously again.

Dragon Con was amazing and I loved building the new Ultron helmet. I'm very happy with how the sculpt and electronics came out with that, and it's given me a lot of ideas for some projects for the future.

This past November, I decided to join the board of directors at Freeside Atlanta, the hackerspace that I do my prop work out of. I've been a member since about mid 2013 and I have very much enjoyed the space and the community. There are a lot of awesome people there and I've loved meeting them and sharing knowledge an experience! I wanted to get more involved and do what I can to help the organization grow, and I've been involved in other communities in the past and knew I had experience and talent to bring to the table.

What I didn't expect was exactly how much of my time doing so would take up. Pretty much from the start I've had a lot of my already limited free time taken up with various tasks and projects in the shop itself. Instead of going to the space to work on projects, the space became my project. Not that I'm complaining - I've been enjoying the experience and I think I've helped accomplish some awesome things! - but learning to balance it has been tricky.

At Freeside I've been shepherding the 3D printers there and making sure they stay in working order. It's been a bit of a tall order, but the process has been a good learning experience! I've also started teaching classes on 3D printing and laser cutting, two of my favorite methods for building things. While this does take up a bit more of my free time, the upside is that I've essentially been able to build my 3D printer for free.

Oh yeah, I've also started to build my own personal 3D printer. It's a mish-mash of ideas from printers I like - the Prisa i3, the MendelMax 2, the LulzBot TAZ - all coming together to build a large area printer for prop making purposes. As of this post I have the chassis designed and assembled, and all but the last few bits purchased. I'm hoping to have it in operation by the end of March.


Until then, my prop work continues! I have a few irons in the fire right now, all of which are very exciting.

I am slowly plugging away at my Vi from League of Legends build. I'm using some new 3D modeling and printing techniques on her, we'll see how it goes. So far I'm very happy!


I've taken a very special commission that I don't want to spoil just yet. Let's just say it's definitely going to grab your attention!


Then lastly, I am working with the Atlanta Cosplay Meetup to build Colonial Marines and Xenos! We are meeting several times a month to build costumes and so far our builds have been going incredibly well.


I'm going to try and stay on top of this blog a bit better now that I am more regularly building things. Next post will likely be a build write-up!
Read More

Thursday, September 11, 2014

Upgrading the Ultron 5 Helmet

This blog post originally appeared on the blog for Freeside Atlanta, a hackerspace located in Atlanta, GA where I do the majority of my work.

Part 1: Building the Armor

My most recent major project was to upgrade a costume I built last year of the Marvel comic's character, Ultron. The costume owner wanted a new and improved helmet, made of cast resin and full of all sorts of lights. It was a big and ambitious project, and I was very excited to get started.


 Here's how we got there.

From the outset we decided that we wanted the master sculpt to be 3D printed - but for those of you familiar with 3D printing, you know that extremely large prints are difficult if not impossible to produce. Most often, you will have to break your model up into many different segments, which you then assemble like a 3D jigsaw puzzle. We opted not to do that, and instead outsourced to a professional 3D printing company based in Florida called TheObjectShop. They have a Zcorp 650, which is a very large printer that prints in a plaster like material, which is then hardened with cyanoacrylate AKA super glue.

The resulting print, while expensive, was absolutely phenomenal.


 Like all 3D prints, the surface had a texture to it that was unsuitable for our needs. I set about cleaning up the surface to as smooth as I could get it, a process which took about 2 and a half weeks. The process is simple - spray the piece with filler primer, fill any large problem areas with bondo or spot filler, and use increasingly finer grits of sandpaper - but extremely tedious and time consuming. I started at 80 grit to knock down some of the bigger problem areas, and worked my way up to 800 grit wet sanding. The results were a helmet that was nearly flawless.


 Now that our master sculpt was completed, we had to create a 2 part jacket mold out of silicone. This would allow us to produce many different copies in urethane resin later down the line. Urethane resin is lighter weight and more sturdy than the brittle plaster 3D print. These are important factors, considering it would be worn for 6-8 hours a day (if not more) and require a bunch of electronics glued and bolted inside of it.

To create the 2 part mold, first we have to make a parting wall all the way around the helmet, which will be the interfacing layer where the 2 sides of the silicone molds touch. We use the end of our Xacto knife to create little bumps all along the edge, which are registration keys that help the two halves line up properly.


 Once the first half of the silicone mold is applied, we flip the whole thing over, remove the parting wall, and apply a coat of releasing agent before we apply the second half of silicone. The releasing agent is absolutely critical - silicone will not stick to anything except other silicone. Without the releasing agent, we would essentially create a big silicone bowl which would be next to impossible to use for our purposes.


Once both halves of the silicone mold were created and fully cured, we created an outer rigid mother mold. This is used to keep the silicone mold held together, once the master is removed and the mold is hollow. It is also applied in two halves, and like the silicone we use a releasing agent when creating the second half.


To make the hollow casting, we use a technique called rotocasting or slush casting. This is where you pour a bit of your urethane resin into the hollow mold and rotate it around so that it evenly coats all of the surfaces with a thin layer. This is done 4-5 times using several small batches of urethane resin, so that we ensure every surface has an even thickness. Because the mold weighs around 10 to 15 pounds before we put a drop of resin into it, and because each layer requires about 5 minutes of tossing it around, I decided to build handles to form into the mother mold. This makes the mother much easier to hold onto during the already strenuous rotocasting process.


After you are finished casting, it's time to remove the mother and the silicone mold. What you are left with is a perfect reproduction of your master sculpt in a much lighter material. The casting process itself is a bit of a learning curve as every mold will be different. Certain areas will come out to be thinner than others, and the exact amount of material you need to use for each batch will depend on a lot of factors. What this means is that the first few castings will tend to be "duds", meaning they are unsuitable for your ultimate purposes - in our case, a wearable costume.


 However, you can still dress up one of these bad casts and stick it on a mannequin to live in the space!


While we were working on sculpting the master and producing the molds, we were also working on the electronic guts that would go into the helmet. Specifically, there would be a set of LEDs set into laser cut acrylic, and a custom made 8 x 24 LED matrix for the mouth.

The eye LEDs are rather simple - I drew up a 2D design to bridge the width of the helmet's eyes, and then cut that out of 2 layers of opaque white acrylic. The inner layer was made of 6mm acrylic which the LEDs were set into and glued into place, and the outer 3mm layer was flat. The results are menacing glowing red eyes.


The mouth LED matrix, on the other hand, is worthy of it's own individual blog post, which I will be putting up later. The short version is that we found and used an Arduino Micro connected to three MAX7219 chips, which are designed to control an 8 x 8 matrix. The matrix had to be designed and wired up by hand, a process which took about 3 weeks of work. After some trial and error with the MAX7219 board kits we used, the whole thing was put together and worked flawlessly. Here is a test video of the center matrix in our temporary holder.


After the matrix was finished, a cover was laser cut out of 1mm clear acrylic and installed into the mouth. The LEDs were transferred into a similar housing for their permanent installation, and all of the boards were put into craft foam holders for protection and installed into the helmet. The results were nothing short of perfect!


At this point the project was finished and ready to be worn, but like any good project it has sparked a whole host of new ideas and "how to do it better"s.

Until next time!
Read More

Thursday, November 7, 2013

Pip-Boy 3000 (Fallout 3) - From 3D model to completed prop

A month or so ago, I found this 3D printable Pip-Boy 3000 from the game Fallout 3 on Instructables. I've always been a fan of the Fallout series - nuclear apocalypse is my favorite kind of apocalypse scenario! - so I had it on the backburner to go ahead and try printing. When I began this project I was preparing to be attending Atlanta Mini Maker Faire as a presenter, and I wanted to have some simple-ish pieces to show off and pad out what my booth will have. And with that, I decided to go ahead and give this a shot.

For those of you unfamiliar with Fallout 3 or what a Pip-Boy actually is, it's essentially a wrist mounted computer that the player uses throughout the game. It's an incredibly iconic piece for anyone familiar with video game props. The modeler did a fantastic job and printing the pieces was very easy.

I also wanted to take this opportunity to address some really common issues that I see in the prop making community with 3D printing and prop building. I see a lot of people who are unfamiliar with the process calling 3D printing "cheating", or taking the fun out of building by not having to do any work, or complaining that people will one day soon be able to simply download and press a button to have their favorite props. Ignoring the fact that I don't see why that would ever be a bad thing, I want to show people what the actual printing process is like and how it is not the magic bullet that those unfamiliar with the process might think it is.

Typically for most of my builds which incorporate 3D printing - which is basically all of them, to some degree - I do the majority of 3D modeling on my own. Either modeling something from scratch, or rebuilding an existing low resolution model that was ripped from a game, or fixing up some existing models out there. Normally this process can take several weeks depending on the complexity of the prop. But this Pip-Boy is the first thing I've printed where I literally just downloaded the files and started printing.

Regardless of the genesis of the files, once you have them you have to run them through a process to generate the tool paths for your 3D printer. From there you load the file it spits out in your printer, and off to the races you go.


This is a piece from my Ultron 5 build; it's not related to the Pip-Boy print, but it's one of the better mid-print photos I have.

A few hours later, you get this. Here is 1 piece out of 15 that is pulled straight off the printer with zero clean up work done it it. Far from a "press print and have a prop" scenario.


Click for larger!

The "spider webbing" that you see in the middle is caused by the printer's print head oozing out plastic while it moves around from one end of the prop to the other. It looks super gross, but you can clean it up with maybe 5 minutes of sanding. You're also seeing the "raft", which is a thin gridwork layer that the actual object gets printed onto. While printing with a raft is not necessarily required, I've found that I am able to get consistently better prints when using one. The downside is that you have to cut and sand off the remnants of it, but it's a small price for making a better quality print. You'll also need to sand down all of the surfaces to get rid of the visible print lines that the printer leaves. Here is the back half of the Pip-Boy (printed in 3 interlocking pieces) in various stages of cleanup.


Click for larger!


Click for larger!

At this point in the process I've spent about 12 hours of work cleaning up, and around 30 hours of 3D printing. I have the 6 pieces for the front and back half all printed and are currently being cleaned and smoothed up before bonding them together. I also need to use some spot putting to fill in some areas where I got a little over zealous with sanding and poked through the printed surface.

The next step in the process is joining all of our pieces together, or at least the biggest ones that need to be joined. For this model, the largest sections are the front and back halves, each printed in 3 prints. The reason these had to be split up is because most extrusion 3D printers can't accommodate a 10" tall object, and the ones that can may have troubles with warping or lifting. Any sort of these problems is really bad news for a print since it means you wasted print time and print material.

This model has nicely designed tabs that align the 2 parts, so after some minor cleanup, the two join together very smoothly. I use regular ole cyanoacrylate to join the two inner faces, putting glue on the inside of the tab slots, and around the face of the joining halves.


Click for larger!


Click for larger!


Click for larger!

I let that cure for a few minutes and the two parts are inseparable. There is a little bit of spot filling to be done, since one half may have had the edge rounded slightly while sanding the print lines down, but that's fairly short work.

In addition to manually sanding down surfaces, I also give the pieces a quick brushing in acetone. Acetone is a solvent that reacts very well with the ABS parts, melting and smoothing them down in to a more uniform shape. It's also interesting how the acetone reacted with the ABS surfaces based on whether it was sanded down or fresh with print lines. The deep black, very reflective areas were the fresh ABS and the other areas are where it was sanded down prior to washing.


Now that I've finished the main body, I'm moving on to the screen and cover. These parts are quite a bit more detailed, and were a real pain to clean up. You can see where where I'm gluing together the 6 or 7 pieces that make up the upper part of the cover and it was a real chore. You can also see on the one side where the raft hasn't been perfectly cleaned off yet either.


When working with the LED holder that goes on front, I was unhappy with the print quality with it because it has a number of overhanging parts. I decided to go ahead and print a new one on one of the 3D printers that Freeside Atlanta has. It's a giant homebrew printer and the prints that come out of it are way better than what I was seeing before on the Cube 3D printer.


This part will need to be acetone washed, but thankfully the print is nice enough that I won't need to do much work on it after. Yay for round parts!

As far as the rest of the pieces, now 3 large parts total, they're being primered and will be getting the usual sand-and-fill.


This brings me to the current state of the Pip-Boy. I gave everything a quick hit of paint before AMMF to display it, but over the next week or two I'll be finishing everything up completely and making everything look nice. One of the guys at Freeside calls me a perfectionist because I am worrying about smoothing out and filling in the gaps on the inside even though "nobody will see it". Amateur! The next installment will cover the molding and casting process.

If you are interested in a pre-order for a casting, check out the listing on my Etsy store.

Thanks for reading!
Read More

Wednesday, October 30, 2013

Atlanta Mini Maker Faire: On missing deadlines, failure, and triage

It was around 1am Saturday morning (still Friday night in my mind) on October 26th. In the past 2 days I had gotten around 3 hours of sleep, all of which on the Freeside sofas, and at this point had been awake for close to 20 hours for the second day in a row.

Myself, one of my build partners, and a few Freeside members were making frantic last minute preparations and we got on the subject of major "maker" news outlets. How they paint build projects in a light where everything goes as planned, nothing ever goes wrong, everything is on time and on budget. They ignore the 20 hour days, the wasted build material, the failed 3D print after failed 3D print. They don't cover the tired, bitchy arguments over whose idea is more practical, and they certainly don't cover the cumulative hours lost to "where did I put that thing?".

We were talking about this because, as I sat there trying to finish a new Ultron helmet - you see, the original one that had about 18 hours of work put into it was simply thrown away by a negligent party - I was coming closer to the realization that I did not have enough time or energy to finish it. At the same time, my partner who had been working on the Iron Patriot helmet animatronics for the umpteenth day since the inception of the build had already called it quits and triaged all but the eye lights.

Triage. Battlefield doctors deciding who lives and dies. It's the best term I've found or used when talking about the last minute do-or-die moments finishing a project hours before a deadline. I could teach a five session class on project triage. It's rare for me to declare something dead on the battlefield. The Gravity Gun, which I premiered at Momocon in March 2013, was on the build table a mere 4 hours before I left to go to the event. Last year at Dragon*Con 2012, the War Machine still had paint drying on the car ride to the hotel. I've cut it close but not missed.


 So finally I bring this blog post to AMMF 2013.  The two weeks leading up to the event, I had just about everything with just about every project go wrong. I had nothing completely finished for AMMF. As I mentioned above, the Ultron 5 helmet was straight up thrown away and had to be completely remade from scratch. And then my Ultron model was in a car wreck (he is fine) and couldn't make it to the event at all, so the Ultron costume was just sitting out on display and not worn. Every aspect of the Iron Patriot wasn't working - the leg repairs weren't finished, the shoulder gun still isn't working properly, and the helmet animatronics are only a single step closer to being completed. My Pip-Boy is coming along somewhat well, but definitely behind where it should be as the "simple project" I started it as. The Bionic Arm that I started last month has had more set backs than steps forward, thanks to fickle 3D printing and laser cutting design flaws.

Basically, everything I brought to my table was half finished. The only thing I did manage to finish in time was the laser etched sign for Overworld Designs. Which took all of about 30 minutes to design and etch.

You might think I am upset or bitter about the whole experience, and yeah I am a little disappointed I didn't have more complete things to show off. However, I used the subject to do what the maker news sites don't do - at my booth, I talked to people about problems and failure and missing deadlines. And how that's apart of the process. How it's okay to not always succeed. There were a lot of kids at AMMF and part of my presentation was showing the process from an ugly looking original 3D print, through all of the steps to a completed project. People see a completed piece and can't fathom how they could ever make something like that, so it's important for me to show all of the steps along the way. And part of this is that sometimes things don't go well.

And that's okay.
Read More