I had been in the market for another 3D printer for my fabrication fleet, and I had my eye on a few machines during Black Friday. I narrowly missed a great sale on a Wanhao Duplicator i3 for a cool $299, and instead I settled on a Folger Tech 2020 i3 kit on sale with an LCD panel.

I had done some reading on this particular kit so I knew to expect some hurdles during it's construction. The biggest complaint that the community has - and indeed I have too - is that the build manual has several mistakes and blatant inaccuracies that Folger Tech has yet to fix. There's some simple stuff like typos of bolt dimensions - using one bolt length in one sentence and another length in the next sentence, leaving you to figure out which one they really mean. These are easy to figure out. But then there's the problem where it tells you to mount the X-axis end stop on the wrong side, and if you don't understand why 3D printers are put together the way they are, you'll have a difficult time understanding why it's moving in the "wrong" direction and why it won't home properly. I highly recommend reading the manual fully before starting to make sure you know what to expect.
There is an absolutely massive thread on the RepRap forums which contain a huge amount of information and fixes. As of this writing, the thread is at 88 pages long and I've only managed to work backwards through about half of it. If you're considering one of these kits I recommend at least skimming through the forum thread on your own, but I've tried to compile the biggest issues and fixes from my experience here.

One minor annoyance I had was with the T-nuts that were included. They are very tiny and difficult to work with and I kept struggling with getting them into place whenever I had to tighten down or move an element. I think they are the ones that are meant to be used after you've put a 2020 frame together, so that you don't have to disassemble everything. But that they are so small it makes them a pain to slide into place along a stretch of aluminum. Your kit may come with regular sized T-nuts, but if I were to buy another one of these kits, I would go ahead and get a bag of regular sized T-nuts just to save myself some frustration.

The electronics setup was straight forward if you've used a RAMPS board before. The build manual tells you where to connect things, but I do recommend pulling up the RAMPS schematic so you know what you're connecting to and why. This is especially the case with the X-axis end stop, since as mentioned before the build manual has some incorrect info.
The RAMPS board I received appears to have had some damage in shipping. I did testing of it and it doesn't seem to be more than cosmetic, but I did read that others had issues with poor quality soldering as well as similar damage. The good news is that Folger Tech is good about sending replacements for parts, but I'm holding off on seeing if that's necessary since I've put about 50 hours on the machine without any hiccups so far.


One problem I do have in the electronics department is that there is not a power switch for the machine. This is a pretty minor complaint, but I do like being able to power off the power supply without having to pull the plug or turn off a power strip. I found a mod on Thingiverse to both add a switch and a removeable power cable which is on my list of to-do upgrades.
Folger Tech has a version of the Marlin firmware on their site to download, but it's quite a few versions behind the current release. The community again comes to the rescue, and therippa has a fork of the latest release of Marlin with the Folger Tech settings already imported. There's also a version that enables auto bed tramming if you decide to upgrade to an inductive Z sensor as well - which I went ahead and added to my build, and in general I can't recommend enough.
Speaking of the Z-axis, the stock Z end stop leaves a lot to be desired. It's difficult to get it really zeroed in since it's attached to the smooth rod. There's a lot of options on how to fix this, and I went with a solution similar to what I've seen on other machines. I printed a part that attaches to the X motor mount points and puts an M3 bolt in the path of the Z end stop. This way you can easily tighten or loosen the bolt to raise or lower the contact point by small increments. I also printed a thumbscrew head for the bolt to make it even easier. Of course, if you are using auto bed tramming, you won't need to worry about this.
The Z-axis is driven by a M5 threaded rod, which seems pretty rickety compared to other machines I use that have M8 or larger lead screws. There is a popular mod for this machine to use M8 lead screws and there are several parts on Thingiverse ready to convert it over if you're so inclined. It seems like a great modification and I may switch to that in the future, but I'm not excited about having to basically completely disassemble the machine just to install it. If you decide to stick with the stock M5 threaded rod, there's also an anti-backlash hack if you want to get the most out of your stock parts. Otherwise, if you want to upgrade to a bigger threaded rod, plan on doing that during your initial build and save yourself some time.

The last problem I had with the Z-axis is that it is simply shorter than is advertised. Folger Tech's site says it has a 7" build height, but the machine really is only able to get about 5" with the Z-axis printed parts. I did find a mod on Thingiverse for Z motor stand-offs that regain the extra 2", but I'm really just confused about why it's advertised with that size. My printing volume with this hack is 200mm x 200mm x 160mm.
I've seen others who have moved the Z-axis steppers to the bottom rather than the top, and again that's something I may do in the future since the top of my machine is already pretty cramped. Between the spool holder and the LCD mount, the steppers would be nice and out of the way on the bottom.

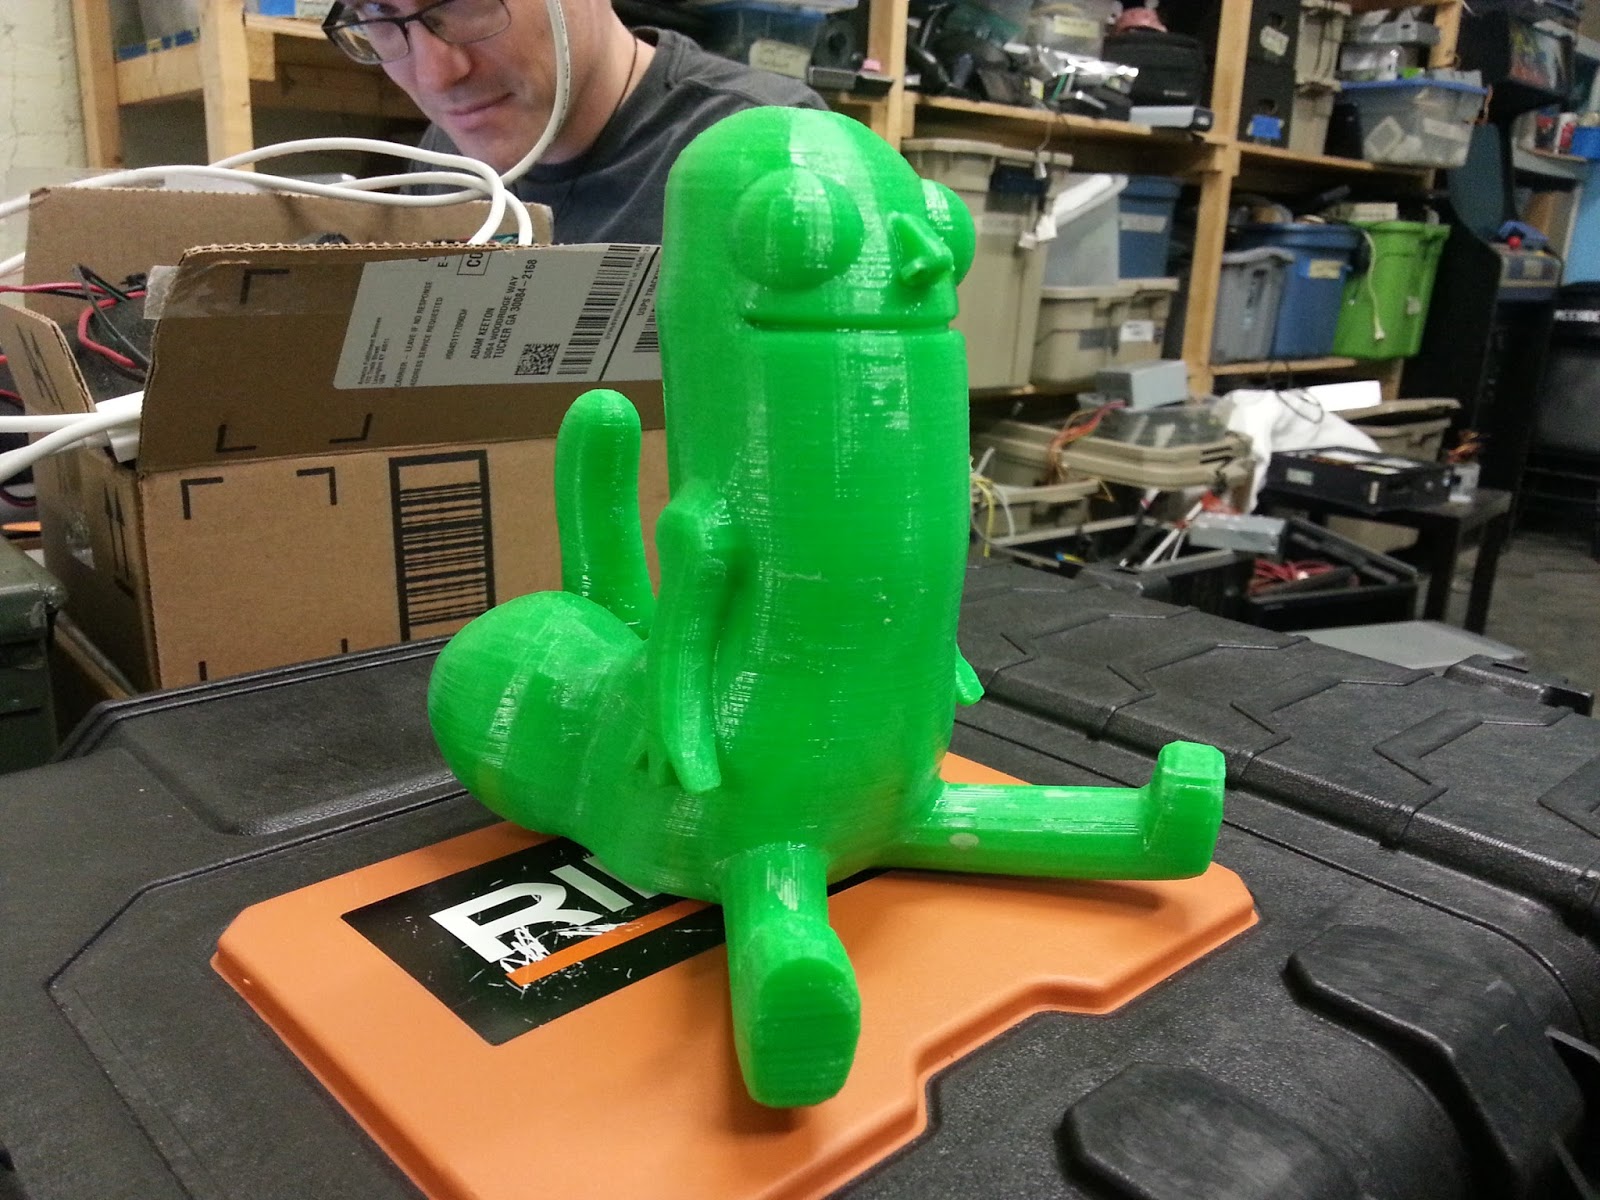
Aside from all of that, I really am quite happy with the printer. The prints coming off of it are an excellent quality and I really have no complaints in that department. I've printed all of the modifications to the machine on itself, so it's a "true" RepRap printer in that regard. One of the first mods I made was a different filament mount, a top mounted bearing spool holder to replace the side mounted one. If you don't use a bearing driven spool holder, I can't recommend them highly enough, it reduces any filament drag artifacts from your prints.

The overall construction is great, the all aluminum frame and the corner brackets make the whole chassis incredibly rigid. This really shows through in the print quality. One thing I especially like is that it uses almost zero laser cut parts, the only ones included are to hold the Z-axis smooth rods in place. Everything else is metal-on-metal contact, or standard 3D printed RepRap parts.
I did go ahead and buy some cable management to tidy up the mess of wires. Back in my PC case modding days I used the nylon flex tubing "Techflex" religiously, so I used that for as many of the runs as I could. I also bought some drag chain for the X and Y axes to minimize issues with cables tugging or crashing into the print. Plus it makes the printer look a lot more clean and professional, which is nice.
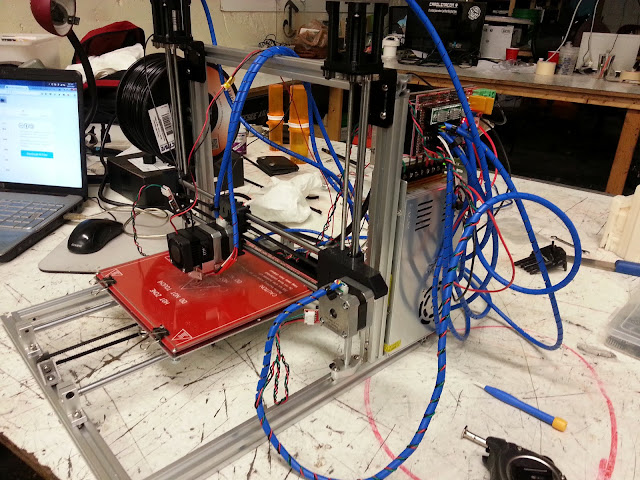
The deal I got included an LCD screen, which I primarily use for the SD card reader since I don't like having to keep a computer attached to my printers at all times. It doesn't come with a mount or a bezel, but thankfully you already have a 3D printer to make one. There's a lot of options available depending on where you want to place yours. I may find a different location for mine since it's a tight fit between the spool holder and the LCD panel on the top. As always, be sure you check your firmware to make the necessary changes to activate the LCD panel and SD card reader!
For the price, this kit really can't be beat and I'm already very happy with it. I would hesitate to say it's great for beginners, but if you're someone who has some hands-on experience with a 3D printer - using one at school or work - and you want to make the jump to buying your own, this would be a good machine to pick up.

Here's a few collections of parts that I recommend looking in to if you're considering buying this machine, or if you already have one and want to fix some of the common bugs with it.
Collection of upgrades on Thingiverse
Collection of upgrades on the RepRap.org forums

I had done some reading on this particular kit so I knew to expect some hurdles during it's construction. The biggest complaint that the community has - and indeed I have too - is that the build manual has several mistakes and blatant inaccuracies that Folger Tech has yet to fix. There's some simple stuff like typos of bolt dimensions - using one bolt length in one sentence and another length in the next sentence, leaving you to figure out which one they really mean. These are easy to figure out. But then there's the problem where it tells you to mount the X-axis end stop on the wrong side, and if you don't understand why 3D printers are put together the way they are, you'll have a difficult time understanding why it's moving in the "wrong" direction and why it won't home properly. I highly recommend reading the manual fully before starting to make sure you know what to expect.
There is an absolutely massive thread on the RepRap forums which contain a huge amount of information and fixes. As of this writing, the thread is at 88 pages long and I've only managed to work backwards through about half of it. If you're considering one of these kits I recommend at least skimming through the forum thread on your own, but I've tried to compile the biggest issues and fixes from my experience here.

One minor annoyance I had was with the T-nuts that were included. They are very tiny and difficult to work with and I kept struggling with getting them into place whenever I had to tighten down or move an element. I think they are the ones that are meant to be used after you've put a 2020 frame together, so that you don't have to disassemble everything. But that they are so small it makes them a pain to slide into place along a stretch of aluminum. Your kit may come with regular sized T-nuts, but if I were to buy another one of these kits, I would go ahead and get a bag of regular sized T-nuts just to save myself some frustration.

The electronics setup was straight forward if you've used a RAMPS board before. The build manual tells you where to connect things, but I do recommend pulling up the RAMPS schematic so you know what you're connecting to and why. This is especially the case with the X-axis end stop, since as mentioned before the build manual has some incorrect info.
The RAMPS board I received appears to have had some damage in shipping. I did testing of it and it doesn't seem to be more than cosmetic, but I did read that others had issues with poor quality soldering as well as similar damage. The good news is that Folger Tech is good about sending replacements for parts, but I'm holding off on seeing if that's necessary since I've put about 50 hours on the machine without any hiccups so far.


One problem I do have in the electronics department is that there is not a power switch for the machine. This is a pretty minor complaint, but I do like being able to power off the power supply without having to pull the plug or turn off a power strip. I found a mod on Thingiverse to both add a switch and a removeable power cable which is on my list of to-do upgrades.
Folger Tech has a version of the Marlin firmware on their site to download, but it's quite a few versions behind the current release. The community again comes to the rescue, and therippa has a fork of the latest release of Marlin with the Folger Tech settings already imported. There's also a version that enables auto bed tramming if you decide to upgrade to an inductive Z sensor as well - which I went ahead and added to my build, and in general I can't recommend enough.
Speaking of the Z-axis, the stock Z end stop leaves a lot to be desired. It's difficult to get it really zeroed in since it's attached to the smooth rod. There's a lot of options on how to fix this, and I went with a solution similar to what I've seen on other machines. I printed a part that attaches to the X motor mount points and puts an M3 bolt in the path of the Z end stop. This way you can easily tighten or loosen the bolt to raise or lower the contact point by small increments. I also printed a thumbscrew head for the bolt to make it even easier. Of course, if you are using auto bed tramming, you won't need to worry about this.
The Z-axis is driven by a M5 threaded rod, which seems pretty rickety compared to other machines I use that have M8 or larger lead screws. There is a popular mod for this machine to use M8 lead screws and there are several parts on Thingiverse ready to convert it over if you're so inclined. It seems like a great modification and I may switch to that in the future, but I'm not excited about having to basically completely disassemble the machine just to install it. If you decide to stick with the stock M5 threaded rod, there's also an anti-backlash hack if you want to get the most out of your stock parts. Otherwise, if you want to upgrade to a bigger threaded rod, plan on doing that during your initial build and save yourself some time.

The last problem I had with the Z-axis is that it is simply shorter than is advertised. Folger Tech's site says it has a 7" build height, but the machine really is only able to get about 5" with the Z-axis printed parts. I did find a mod on Thingiverse for Z motor stand-offs that regain the extra 2", but I'm really just confused about why it's advertised with that size. My printing volume with this hack is 200mm x 200mm x 160mm.
I've seen others who have moved the Z-axis steppers to the bottom rather than the top, and again that's something I may do in the future since the top of my machine is already pretty cramped. Between the spool holder and the LCD mount, the steppers would be nice and out of the way on the bottom.

Aside from all of that, I really am quite happy with the printer. The prints coming off of it are an excellent quality and I really have no complaints in that department. I've printed all of the modifications to the machine on itself, so it's a "true" RepRap printer in that regard. One of the first mods I made was a different filament mount, a top mounted bearing spool holder to replace the side mounted one. If you don't use a bearing driven spool holder, I can't recommend them highly enough, it reduces any filament drag artifacts from your prints.

The overall construction is great, the all aluminum frame and the corner brackets make the whole chassis incredibly rigid. This really shows through in the print quality. One thing I especially like is that it uses almost zero laser cut parts, the only ones included are to hold the Z-axis smooth rods in place. Everything else is metal-on-metal contact, or standard 3D printed RepRap parts.
I did go ahead and buy some cable management to tidy up the mess of wires. Back in my PC case modding days I used the nylon flex tubing "Techflex" religiously, so I used that for as many of the runs as I could. I also bought some drag chain for the X and Y axes to minimize issues with cables tugging or crashing into the print. Plus it makes the printer look a lot more clean and professional, which is nice.

The deal I got included an LCD screen, which I primarily use for the SD card reader since I don't like having to keep a computer attached to my printers at all times. It doesn't come with a mount or a bezel, but thankfully you already have a 3D printer to make one. There's a lot of options available depending on where you want to place yours. I may find a different location for mine since it's a tight fit between the spool holder and the LCD panel on the top. As always, be sure you check your firmware to make the necessary changes to activate the LCD panel and SD card reader!
For the price, this kit really can't be beat and I'm already very happy with it. I would hesitate to say it's great for beginners, but if you're someone who has some hands-on experience with a 3D printer - using one at school or work - and you want to make the jump to buying your own, this would be a good machine to pick up.

Here's a few collections of parts that I recommend looking in to if you're considering buying this machine, or if you already have one and want to fix some of the common bugs with it.
Collection of upgrades on Thingiverse
Collection of upgrades on the RepRap.org forums


