I really love 3D printing. I enjoy the end results as much as I am interested in the technology behind the machines themselves. Having a background in 3D design, it was obvious to me that 3D printing was something I was going to get interested and involved in. But had you told me 5 years ago that I would be building them from scratch, I'd have a hard time believing you. Unfortunately for past me, I've done just that - since November, I have built three printers from nothing.

My journey of self built printers began last year when I started researching various Prusa i3 designs. I had a few things I needed from a printer - it had to be reliable, it had to be sturdy, and it had to have high print fidelity. For these reasons, I wanted a printer frame built from aluminum extrusion (and it didn't hurt that I had a bunch on hand already). I also wanted it to be as close to a full RepRap as possible - no acrylic or machined parts. Some people might consider this a negative, but don't forget I am an enthusiast in the tech as much as I am the finished results.

After doing some research, I settled on an Adapto printer - it had a large build volume, it was built entirely from 2020 aluminum extrusion, and all of the parts were printed. I put together the aluminum bits and started printing things, and I ran into a few snags. The first of which is that the threaded rod I had on hand was larger than what the design called for. While that isn't a big problem - it's simple enough to modify the designs - the new printed parts began having problems where the captured nut would physically intersect where the linear bearings would be. Or in simpler terms - I would have to start majorly redesigning the printer, or buy all new parts, if I wanted to use it.

I was a little frustrated with the process, and around this time, the Colonial Marines group build at Freeside began to consume all of my free time. I had set the Adapto on the shelf to pick back up, where it was untouched for most of last year. Once the group project and the various events for the year was over, I started researching some other RepRap designs. I was planning on rebuilding one of Freeside Atlanta's printers into a new usable design, and came across the Wilson TS. I did an inventory of all of the parts I had on hand, and it turns out I had everything I needed to convert my Adapto to a Wilson.

I was building The Kraken and my Wilson in tandem and the build was a breeze. The instructions online from mjrice are pretty good - his videos are for the 10mm smooth rod version instead of the 8mm ones I was building, so parts differ a bit - but having put together both my Folger Tech 2020 i3 and doing a lot of work on my LulzBot AO-101 and Freeside's AO-100, I knew my way around how to put a printer together.

I did decide to make a few modifications right away. The first of which is to help the structural support of the machine by adding in some hidden corner braces in all of the 2020 corners, and L brackets where the X-axis and Y-axis frames meet. This helps make the printer be extremely rigid and the prints that come off of it look amazing. I also added in an inductive sensor for the Z probe to enable auto bed tramming, a feature on the LulzBot Mini that I am totally in love with. Having your first layer always be perfect without much interaction is a real dream come true, even if the initial setup is a bit of a hassle.

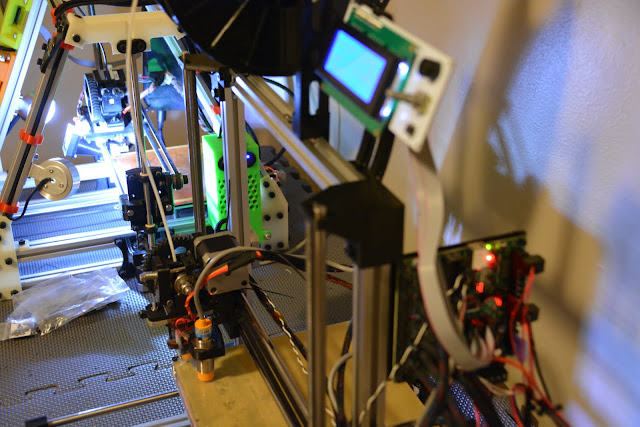
I purchased an LCD screen with SD card support so that I can run the printer without having my laptop connected. This is an important feature for me since I am often running all of my machines simultaneously, and I don't want to have my laptop permanently attached to them. On my Wilson I am using a RAMBo board, and setting up the LCD had some pitfalls. The Arduino board library has to be modified in order for the RAMBo to properly output to the LCD. Here's the article I found on doing just that.
I added a top-mount for my filament spool, but I may actually take this off as it seems to have created a really unbalanced load. Running the printer at the speeds I had while the spool was on the table causes it to vibrate and move around a lot. I'm going to slow down the printing a bit and try to tune the feedrate, jerk, and acceleration settings. But having a really slow printing machine isn't a lot of benefit to me so hopefully I don't have to slow it down too much.
I've only been printing on the Wilson for a couple of weeks and I'm really happy with both my Wilson and Freeside's "The Kraken". For my next printer I am going to look into the Wilson 2 which improves on the current design, and given how great of a machine this already is, I think the Wilson 2 could be an outstanding machine.

Here are some links to the parts and designs used for my Wilson builds:

My journey of self built printers began last year when I started researching various Prusa i3 designs. I had a few things I needed from a printer - it had to be reliable, it had to be sturdy, and it had to have high print fidelity. For these reasons, I wanted a printer frame built from aluminum extrusion (and it didn't hurt that I had a bunch on hand already). I also wanted it to be as close to a full RepRap as possible - no acrylic or machined parts. Some people might consider this a negative, but don't forget I am an enthusiast in the tech as much as I am the finished results.

After doing some research, I settled on an Adapto printer - it had a large build volume, it was built entirely from 2020 aluminum extrusion, and all of the parts were printed. I put together the aluminum bits and started printing things, and I ran into a few snags. The first of which is that the threaded rod I had on hand was larger than what the design called for. While that isn't a big problem - it's simple enough to modify the designs - the new printed parts began having problems where the captured nut would physically intersect where the linear bearings would be. Or in simpler terms - I would have to start majorly redesigning the printer, or buy all new parts, if I wanted to use it.

I was a little frustrated with the process, and around this time, the Colonial Marines group build at Freeside began to consume all of my free time. I had set the Adapto on the shelf to pick back up, where it was untouched for most of last year. Once the group project and the various events for the year was over, I started researching some other RepRap designs. I was planning on rebuilding one of Freeside Atlanta's printers into a new usable design, and came across the Wilson TS. I did an inventory of all of the parts I had on hand, and it turns out I had everything I needed to convert my Adapto to a Wilson.

I was building The Kraken and my Wilson in tandem and the build was a breeze. The instructions online from mjrice are pretty good - his videos are for the 10mm smooth rod version instead of the 8mm ones I was building, so parts differ a bit - but having put together both my Folger Tech 2020 i3 and doing a lot of work on my LulzBot AO-101 and Freeside's AO-100, I knew my way around how to put a printer together.

I did decide to make a few modifications right away. The first of which is to help the structural support of the machine by adding in some hidden corner braces in all of the 2020 corners, and L brackets where the X-axis and Y-axis frames meet. This helps make the printer be extremely rigid and the prints that come off of it look amazing. I also added in an inductive sensor for the Z probe to enable auto bed tramming, a feature on the LulzBot Mini that I am totally in love with. Having your first layer always be perfect without much interaction is a real dream come true, even if the initial setup is a bit of a hassle.

I purchased an LCD screen with SD card support so that I can run the printer without having my laptop connected. This is an important feature for me since I am often running all of my machines simultaneously, and I don't want to have my laptop permanently attached to them. On my Wilson I am using a RAMBo board, and setting up the LCD had some pitfalls. The Arduino board library has to be modified in order for the RAMBo to properly output to the LCD. Here's the article I found on doing just that.
I added a top-mount for my filament spool, but I may actually take this off as it seems to have created a really unbalanced load. Running the printer at the speeds I had while the spool was on the table causes it to vibrate and move around a lot. I'm going to slow down the printing a bit and try to tune the feedrate, jerk, and acceleration settings. But having a really slow printing machine isn't a lot of benefit to me so hopefully I don't have to slow it down too much.

I've only been printing on the Wilson for a couple of weeks and I'm really happy with both my Wilson and Freeside's "The Kraken". For my next printer I am going to look into the Wilson 2 which improves on the current design, and given how great of a machine this already is, I think the Wilson 2 could be an outstanding machine.

Here are some links to the parts and designs used for my Wilson builds:
- Wilson on the RepRap wiki, github, and thingiverse
- Inductive sensor for auto bed tramming
- Aluminum plate for the print bed
- 0.03" PEI sheet for the print surface
- 3M 468MP adhesive sheet to attach the PEI to the aluminum plate


